另外一个容器间建立网络的工具。
目标
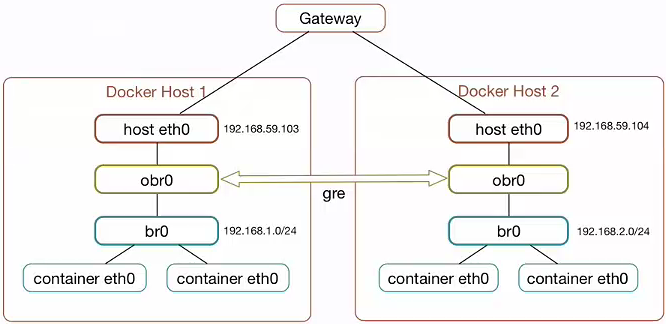
利用Open vSwitch项目实现跨主机容器互联网络的构建
参考
极客学院:Docker容器的跨主机访问 利用OpenVSwitch构建多主机Docker网络
介绍OVS
Open vSwitch是一个高质量的、多层虚拟交换机,使用开源Apache2.0协议,由Nicira Networks开发,主要实现代码为可移植的C。目的是让大规模网络自动化可以通过编程扩展,同时仍然支持标准的管理接口和协议(例如NetFlow,sFlow,SPAN,CLI,RSPAN,LACP,802.1ag)。
GRE,通用路由协议封装。GRE隧道,隧道技术是一种通过使用互联网络的基础设施在网络之间传递数据的方式。使用隧道传递的数据(或负载)可以是不同协议的数据帧或包。隧道协议将其他协议的数据帧或包重新封装后通过隧道发送。新的帧头提供路由信息,以便通过互联网传递被封装的负载数据。(隧道协议提供一种点对点的再封装的技术)
安装OVS
amy@ubuntu-host1:~$ sudo apt-get install -y build-essential
amy@ubuntu-host1:~$ sudo apt-get install openvswitch-switch
amy@ubuntu-host1:~$ sudo ovs-vsctl --version
配置过程
虚拟交换机主要配置过程:
amy@ubuntu-host1:~$ sudo docker images
REPOSITORY             TAG                 IMAGE ID            CREATED             VIRTUAL SIZE
nginx_cct              v1                  68636b988dc3        46 seconds ago      239 MB
weaveworks/plugin      latest              b8eadc3d377e        32 hours ago        73.12 MB
weaveworks/weaveexec   latest              5c4ba1dea15e        32 hours ago        62.47 MB
weaveworks/weave       latest              7cfb8a86400b        32 hours ago        20.5 MB
ubuntu                 latest              af88597ec24b        10 days ago         187.9 MB
amy@ubuntu-host1:~$ ifconfig
docker0   Link encap:Ethernet  HWaddr 02:42:8f:17:00:69
          inet addr:172.17.0.1  Bcast:0.0.0.0  Mask:255.255.0.0
          inet6 addr: fe80::42:8fff:fe17:69/64 Scope:Link
          UP BROADCAST MULTICAST  MTU:1500  Metric:1
          RX packets:4575 errors:0 dropped:0 overruns:0 frame:0
          TX packets:4949 errors:0 dropped:0 overruns:0 carrier:0
          collisions:0 txqueuelen:0
          RX bytes:208535 (208.5 KB)  TX bytes:40288521 (40.2 MB)

eth0      Link encap:Ethernet  HWaddr 00:0c:29:84:16:3a
          inet addr:202.117.16.140  Bcast:202.117.16.255  Mask:255.255.255.0
          inet6 addr: fe80::20c:29ff:fe84:163a/64 Scope:Link
          UP BROADCAST RUNNING MULTICAST  MTU:1500  Metric:1
          RX packets:99787 errors:0 dropped:0 overruns:0 frame:0
          TX packets:20582 errors:0 dropped:0 overruns:0 carrier:0
          collisions:0 txqueuelen:1000
          RX bytes:117404514 (117.4 MB)  TX bytes:1337023 (1.3 MB)

lo        Link encap:Local Loopback
          inet addr:127.0.0.1  Mask:255.0.0.0
          inet6 addr: ::1/128 Scope:Host
          UP LOOPBACK RUNNING  MTU:65536  Metric:1
          RX packets:5892 errors:0 dropped:0 overruns:0 frame:0
          TX packets:5892 errors:0 dropped:0 overruns:0 carrier:0
          collisions:0 txqueuelen:0
          RX bytes:297841 (297.8 KB)  TX bytes:297841 (297.8 KB)
1.建立ovs网桥
amy@ubuntu-host1:~$ sudo ovs-vsctl show
6947c564-9c63-4f82-89b6-8320823d7a99
    ovs_version: "2.0.2"
amy@ubuntu-host1:~$ sudo ovs-vsctl add-br obr0
2.添加gre连接
amy@ubuntu-host1:~$ sudo ovs-vsctl add-port obr0 gre0
amy@ubuntu-host1:~$ sudo ovs-vsctl set interface gre0 type=gre options:remote_ip=202.117.16.141 //要远程连接的IP地址
amy@ubuntu-host1:~$ sudo ovs-vsctl show
6947c564-9c63-4f82-89b6-8320823d7a99
    Bridge "obr0"
        Port "obr0"
            Interface "obr0"
                type: internal //内置接口连接br0自定义docker网桥
        Port "gre0"
            Interface "gre0"
                type: gre //外接口连接远程访问的IP
                options: {remote_ip="202.117.16.141"}
    ovs_version: "2.0.2"
amy@ubuntu-host1:~$ ifconfig
docker0   Link encap:Ethernet  HWaddr 02:42:8f:17:00:69
          inet addr:172.17.0.1  Bcast:0.0.0.0  Mask:255.255.0.0
          inet6 addr: fe80::42:8fff:fe17:69/64 Scope:Link
          UP BROADCAST MULTICAST  MTU:1500  Metric:1
          RX packets:4575 errors:0 dropped:0 overruns:0 frame:0
          TX packets:4949 errors:0 dropped:0 overruns:0 carrier:0
          collisions:0 txqueuelen:0
          RX bytes:208535 (208.5 KB)  TX bytes:40288521 (40.2 MB)

eth0      Link encap:Ethernet  HWaddr 00:0c:29:84:16:3a
          inet addr:202.117.16.140  Bcast:202.117.16.255  Mask:255.255.255.0
          inet6 addr: fe80::20c:29ff:fe84:163a/64 Scope:Link
          UP BROADCAST RUNNING MULTICAST  MTU:1500  Metric:1
          RX packets:100240 errors:0 dropped:0 overruns:0 frame:0
          TX packets:20594 errors:0 dropped:0 overruns:0 carrier:0
          collisions:0 txqueuelen:1000
          RX bytes:117438204 (117.4 MB)  TX bytes:1338403 (1.3 MB)

lo        Link encap:Local Loopback
          inet addr:127.0.0.1  Mask:255.0.0.0
          inet6 addr: ::1/128 Scope:Host
          UP LOOPBACK RUNNING  MTU:65536  Metric:1
          RX packets:6042 errors:0 dropped:0 overruns:0 frame:0
          TX packets:6042 errors:0 dropped:0 overruns:0 carrier:0
          collisions:0 txqueuelen:0
          RX bytes:305341 (305.3 KB)  TX bytes:305341 (305.3 KB)

obr0      Link encap:Ethernet  HWaddr f2:d3:cc:57:d2:46
          inet6 addr: fe80::7004:51ff:fe45:4abe/64 Scope:Link
          UP BROADCAST RUNNING  MTU:1500  Metric:1
          RX packets:0 errors:0 dropped:0 overruns:0 frame:0
          TX packets:8 errors:0 dropped:0 overruns:0 carrier:0
          collisions:0 txqueuelen:0
          RX bytes:0 (0.0 B)  TX bytes:648 (648.0 B)
3.配置docker容器自定义虚拟网桥
amy@ubuntu-host1:~$ sudo brctl addbr br0
amy@ubuntu-host1:~$ sudo ifconfig br0 192.168.1.1 netmask 255.255.255.0
amy@ubuntu-host1:~$ sudo brctl show
bridge name	bridge id		STP enabled	interfaces
br0		8000.000000000000	no
docker0		8000.02428f170069	no
amy@ubuntu-host1:~$ sudo ifconfig br0
br0       Link encap:Ethernet  HWaddr 7e:53:e8:da:8e:65
          inet addr:192.168.1.1  Bcast:192.168.1.255  Mask:255.255.255.0
          inet6 addr: fe80::7c53:e8ff:feda:8e65/64 Scope:Link
          UP BROADCAST RUNNING MULTICAST  MTU:1500  Metric:1
          RX packets:0 errors:0 dropped:0 overruns:0 frame:0
          TX packets:48 errors:0 dropped:0 overruns:0 carrier:0
          collisions:0 txqueuelen:0
          RX bytes:0 (0.0 B)  TX bytes:7861 (7.8 KB)
4.为自定义虚拟网桥添加ovs接口
amy@ubuntu-host1:~$ sudo brctl addif br0 obr0
amy@ubuntu-host1:~$ sudo brctl show
bridge name	bridge id		STP enabled	interfaces
br0		8000.f2d3cc57d246	no		obr0
docker0		8000.02428f170069	no
5.更换容器的网桥为自定义网桥
root@ubuntu-host1:~# echo "DOCKER_OPTS=\"-b=br0\"" >> /etc/default/docker
root@ubuntu-host1:~# echo "DOCKER_OPTS=\"-b=br0\"" >> /etc/default/docker
root@ubuntu-host1:~# sudo service docker start
docker start/running, process 40675
root@ubuntu-host1:~# ps -ef | grep docker
root      40675      1  1 10:43 ?        00:00:00 /usr/bin/docker daemon -b=br0
root      40749  40626  0 10:43 pts/3    00:00:00 grep --color=auto docker
6.添加跨主机的Docker容器所在网段的路由规则
amy@ubuntu-host1:~$ route
Kernel IP routing table
Destination     Gateway         Genmask         Flags Metric Ref    Use Iface
default         16h164.xjtu.edu 0.0.0.0         UG    0      0        0 eth0
link-local      *               255.255.0.0     U     1000   0        0 eth0
172.17.0.0      *               255.255.0.0     U     0      0        0 docker0
192.168.1.0     *               255.255.255.0   U     0      0        0 br0
202.117.16.0    *               255.255.255.0   U     0      0        0 eth0
amy@ubuntu-host1:~$ sudo ip route add 192.168.2.0/24 via 202.117.16.141 dev eth0
//即目标网络为192.168.2.0/24(注意掩码不可少),需通过要远程访问容器的宿主机的以太网口查找
amy@ubuntu-host1:~$ route
Kernel IP routing table
Destination     Gateway         Genmask         Flags Metric Ref    Use Iface
default         16h164.xjtu.edu 0.0.0.0         UG    0      0        0 eth0
link-local      *               255.255.0.0     U     1000   0        0 eth0
172.17.0.0      *               255.255.0.0     U     0      0        0 docker0
192.168.1.0     *               255.255.255.0   U     0      0        0 br0
192.168.2.0     16h140.xjtu.edu 255.255.255.0   UG    0      0        0 eth0
202.117.16.0    *               255.255.255.0   U     0      0        0 eth0
对于Host2的配置共同与上边完全一致。
7.测试跨主机容器互通
## host1上启动容器
amy@ubuntu-host1:~$ sudo docker run -ti P nginx_cct:v1
root@8693fe65b80a:/# ifconfig eth0
inet addr:192.168.1.2 Bcast:0.0.0.0 Mask:255.255.255.0
root@8693fe65b80a:/# nginx
## host2上启动容器
amy@ubuntu-host2:~$ sudo docker run -ti P nginx_cct:v1
root@cc3de32ddd90:/# ifconfig eth0
inet addr:192.168.2.2 Bcast:0.0.0.0 Mask:255.255.255.0
root@cc3de32ddd90:/# nginx
## 测试连通--ping
root@8693fe65b80a:/# ping 192.168.2.2
PING 192.168.2.2(192.168.2.2) 56(84) bytes of data.
64 bytes from 192.168.2.2: icmp_seq=1 ttl=62 time=0.621 ms
64 bytes from 192.168.2.2: icmp_seq=1 ttl=62 time=0.404 ms
64 bytes from 192.168.2.2: icmp_seq=1 ttl=62 time=0.397 ms
## 访问nginx服务
root@8693fe65b80a:/# curl 192.168.2.2
<!DOCTYPE html>
<html>
<head>
<title>Welcome to nginx!</title>
<style>
    body {
        width: 35em;
        margin: 0 auto;
        font-family: Tahoma, Verdana, Arial, sans-serif;
    }
</style>
</head>
<body>
<h1>Welcome to nginx!</h1>
<p>If you see this page, the nginx web server is successfully installed and
working. Further configuration is required.</p>

<p>For online documentation and support please refer to
<a href="http://nginx.org/">nginx.org</a>.<br/>
Commercial support is available at
<a href="http://nginx.com/">nginx.com</a>.</p>

<p><em>Thank you for using nginx.</em></p>
</body>
</html>
ok,到此已实现跨主机容器服务访问。
总结:
1.可以通过在obr0网桥上设置多个gre接口,连通多台主机。 2.不同主机上的容器网桥br0所分配子网可以不再一个网段。 3.可以使用–fixed-cidr划分每台主机上容器地址分配范围。 4.配置简单,直接网桥协议实现不需Overlay网络。